Friday, March 22, 2013

HAPPY 1ST BIRTHDAY TO THE FOOD DEPT

The food dept has turned 1! WOW!
Hip hip hooray it's our first birthday! It's a year since our very first post and what an amazing year we have had. Thank you everyone for supporting and following us and sending your wonderful messages and comments. We have really enjoyed working on our shoots, and we are sure you will agree the fun and friendship we experience on our days shooting translates to the blog. To celebrate we have created this sweet video of our divine red velvet layer cake.


HAPPY 1ST BIRTHDAY TO THE FOOD DEPT from thefooddept on Vimeo.


:::::::::::::::::::::::::::::::::::::::::::::::::::::::::::::::::::::::::::::::::::::::::::::::::::::::::::::::::::::::::::::::::::::::::::::::::::::::::::::::::::::::::::::::::::::::::::::::::::::::::::::::::::::::::::::::::
Red velvet layer cake with fresh raspberries and mascarpone icing
This fabulous cake has a little history for us. It all started with Anne Marie's mother Toni who made it for one of her five children's birthdays'. It was so popular amongst the Cummins family that Anne Marie made it for her Sydney hairdresser, Renya Xydis to try. Now Renya's family adore the cake and place regular orders for the cake, for their parties and birthday celebrations. Whenever Anne Marie makes this cake, it is quickly eaten (followed by lots of ooh's and ahh's) and then people ask for the recipe. So when it came to deciding on the perfect 1st birthday cake for the food dept, there was no contest, but to make this indulgent, creamy layer cake. In Anne Marie's word's "It's a show stopper cake!" Bon apetit!
Makes 1 x 20cm cake, serves 10 (or 8 people with a sweet tooth!).

• 125g butter, room temperature
• 1½ cups caster sugar
• 2 eggs
• 1½ cups plain flour
• 2 tablespoons corn flour
• 2 tablespoons Dutch cocoa powder
• 1 cup buttermilk
• 1 tablespoon red gel food colouring
• 1 teaspoon vanilla extract
• 1 teaspoon bicarbonate of soda
• 1 teaspoon white vinegar
• 1 quantity Mascarpone icing
• 2 punnets raspberries
• white chocolate curls, to decorate


1. Preheat the oven to 180ºC (360ºF). Grease and line the base and sides of 2 x 20cm cake pans.
2. Combine the butter, caster sugar and eggs in a large mixing bowl and beat with an electric mixer until light and fluffy.
3. Sift together the flour, cornflour and Dutch cocoa and set aside.
4. In a jug combine the buttermilk, red colouring and vanilla, whisk well.
5. Add half of the sifted flour mixture and half of the buttermilk mixture to the creamed butter mixture, stir well.
6. Add the remaining flour and buttermilk mixtures and mix through.
7. Combine the bicarbonate of soda and vinegar together and add to the cake mixture, mix well.
8. Divide the mixture evenly between the 2 cake pans and bake for 30 minutes or until cooked when tested.
9. Remove from the oven and allow to stand in the cake pans for 10 minutes. Turn out onto a cake cooler lined with baking paper and turn the cakes over so they are the right way up. Cool completely.
10. Wrap the cakes in plastic and place in the freezer for 45 minutes until firm. Remove from the freezer and cut each cake in half to form 4 layers.
11. Place the first layer of the cake onto the serving plate and spread over 2/3 cup of the Mascarpone icing. Break open the raspberries so they are flat and arrange evenly over the icing. Repeat with the icing and raspberries for the next 2 layers of cake and top with the final layer of cake. Pack extra icing where needed into the layers of the cake to make it even and straight sided.
12. Divide the remaining icing in half. Spread half of the icing over the cake to form a crumb coat. Recoat the cake with a fine layer of the remaining icing and decorate with chocolate curls. Store in the refrigerator until ready to serve.


Mascarpone icing
This beautiful icing is what makes the red velvet layer cake. If you have any left over, Sally's hot tip is to pipe it into sweet pastry shells, top with a raspberry or blueberry and sprinkle with icing sugar. YUM!

• 375g cream cheese, at room temperature
• 1 ½ cups icing sugar
• 1 teaspoon vanilla extract
• 375g mascarpone
• 450ml thickened cream

1. Combine the cream cheese, icing sugar and vanilla in a bowl and mix with an electric mixer until light and fluffy. Add the mascarpone and beat until smooth. Add the thickened cream and beat until smooth and creamy.
2. Refrigerate for 30 minutes to firm the icing and use as required.


White chocolate curls
 Makes 3 large curls

• 150g white chocolate, melted

1. Cut 2 strips of baking paper (20cm x 10cm). Using 1/3 of the melted chocolate brush onto one strip of the paper, repeat with remaining chocolate and paper.
2. Lay the chocolate-coated paper strips over a bottle or jar and allow to set in the fridge.
3. Once set, peel away the paper and use as required.

Saturday, February 23, 2013

TOMATOES - Make mine a bloody Mary... and double the dirty. Sunday is the perfect day for you to try the food dept's dirty bloody Mary with green olive grissini, it's one of many ways to use your tomatoes.


Want more of our Italian recipes?
Get your March copy of ABC delicious. magazine on newstands or go to
http://www.deliciousmagazine.com.au


:::::::::::::::::::::::::::::::::::::::::::::::::::::::::::::::::::::::::::::::::::::::::::::::::::::::::::::::::::::::::::::::::::::::::::::::::::::::::::::::::::::::::::::::::::::::::::::::::::::::::::::::::::::::::::::::::::::
Tomato and rosemary focaccia with basil oil
The vibrant colours in this focaccia are so Italian, bellissimo!
Make 1 x 32cm focaccia.

• 500g bread flour
• 2 teaspoons dried yeast
• 1 teaspoon salt flakes
• 300ml warm water
• olive oil spray, for greasing
• 2 tablespoons extra virgin olive oil
• 400g medley mix tomatoes
• extra, 1 tablespoon extra virgin olive oil
• 1 tablespoon rosemary leaves
• extra, sea salt flakes, for sprinkling
• Basil oil, for serving

1. Combine the flour, yeast and salt in the bowl of a mixer. Using a dough hook turn the mixer onto low and combine the ingredients.
2. Gradually pour in the combined water and oil while the mixer is still running. Increase to a medium speed and ‘knead’ the dough for 5 minutes.
3. Turn the dough onto the bench and lightly oil the mixing bowl with spray, return the dough to the oiled bowl and roll the dough around so that it is coated in oil. Cover with a clean tea towel and allow to stand in a warm place for 30 minutes or until the dough has doubled in size. A warm windowsill or over a sink of hot water works well if it’s a cool day.
4. Once the dough has doubled in size turn onto the bench and knead for a few minutes until the dough is back to its original size.
5. Pour half of the extra oil into a 32cm ovenproof frying pan. Roll out the dough to the approximate size of the frying pan and lift into the pan. Cover again with a clean tea towel and place back in a warm spot for another 30 minutes until it has again doubled in size.
6. Preheat the oven to 200ºC (400ºF). Using your fingers push indents into the dough, covering the surface. Push the tomatoes into the indents, evenly spaced. Brush liberally with the remaining olive oil and sprinkle with rosemary and extra salt flakes. Bake for 20-25 minutes until golden and sounds hollow when tapped.
Serve warm with Basil oil.


Basil oil
Makes 1 cup.
 
2 cups basil leaves, approximately 1 large bunch
1 cup olive oil
salt and pepper, to taste

1. To blanch the basil, place the basil leaves into a heat resistant bowl, pour over boiling water and stand for 10 seconds. Drain immediately and plunge into a bowl or iced water, allow to stand for a few minutes until cold.
2. Drain the basil leaves and thoroughly squeeze out the water, combine with the oil, salt and pepper in a small processor and blend until the basil is pureed.
3. Strain using a fine sieve and store in a clean jar, in the refrigerator for up to a month. Return to room temperature before serving.

food dept. fact:For a more rustic basil oil, leave the oil unstrained.


:::::::::::::::::::::::::::::::::::::::::::::::::::::::::::::::::::::::::::::::::::::::::::::::::::::::::::::::::::::::::::::::::::::::::::::::::::::::::::::::::::::::::::::::::::::::::::::::::::::::::::::::::::::::::::::::::::::::
TFD’s dirty bloody Mary mix 
Makes 4½ cups (6 drinks).

• 1 litre tomato juice
• 2 teaspoons prepared horseradish
• 2 teaspoons salt flakes
• 1 teaspoon freshly ground black pepper
• juice 1 lemon
• 2 teaspoons Worcestershire sauce
• ½ - 1 teaspoon tobacco sauce, or to taste
• 1/3 cup brine from green olives

1. Combine all ingredients in a large jug and whisk to combine.
2. Store in the refrigerator until required, for up to 1 week.

TFD’s dirty bloody Mary
Makes 1 drink.

• 2 lemon wedges
• celery salt, for glassses
• 3/4 cup TFD’s dirty bloody mary mix
• 2 tablespoons vodka
• 1 stalk cucumber
 
1. Using one of the lemon wedges, wipe the rim of a glass and dip into celery salt, set aside.
2. Pour the Bloody Mary mix into the prepared glass and top with vodka, garnish with cucumber and remaining lemon wedge. 
Serve with Green olive grissini.


::::::::::::::::::::::::::::::::::::::::::::::::::::::::::::::::::::::::::::::::::::::::::::::::::::::::::::::::::::::::::::::::::::::::::::::::::::::::::::::::::::::::::::::::::::::::::::::::::::::::::::::::::::::::::::::::
Green olive grissini
Makes 25 sticks.

• 350g jar green olives, drain and reserve the juice for the TFDs's dirty bloody mary mix
• 2 tablespoons baby capers in brine, drained
• 1 clove garlic
• 2 tablespoons extra virgin olive oil
• salt and pepper, to taste
• 1 sheet frozen puff pastry

1. Preheat oven to 200ºC (400ºF). Combine the olives, capers, garlic, olive oil, salt and pepper in a small food processor and process to form a paste.
2. Lay the sheet of puff pastry on its plastic liner onto a chopping board. Using a ruler to guide you and a pizza wheel, cut 1cm strips of the pastry, trying to keep the strips together.
3. Spread 2 tablespoons of the green olive paste onto the sheet of strips. Take each strip and give it 2-3 twists and then place onto a lined oven tray.
4. Bake for 10-12 minutes or until golden, remove from the oven and allow to cool on the tray. Store in an airtight container.

food dept. fact: Store left over green olive paste in a jar in refrigerator for up to 1 month, use on bruschetta, pizzas or through pasta.


THANK YOU! We would like to thank the generous people at Moratis for supplying us with the fresh, juicy, plump tomatoes for this story.
http://www.moraitis.com.au/


Wednesday, February 13, 2013

VALENTINE'S DAY - Apple martinis with oysters, a perfect match.


:::::::::::::::::::::::::::::::::::::::::::::::::::::::::::::::::::::::::::::::::::::::::::::::::::::::::::::::::::::::::::::::::::::::::::::::::::::::::::::::::::::::::::::::::::::::::::::::::::::::::::::::::::::::::::::::::::::::::::::::::::::::::::::::::::::::::::::::::::::::::::::
Oysters with lemon and black pepper granita
This zesty, zingy and fresh granita makes enough for several dozen oysters. So you can use as much or as little depending on how many you are catering for and keep the rest in the freezer for up to 3 months.

• 1 cup freshly squeezed lemon juice, approximately 4 lemons
• 2 tablespoons water 
• 1 tablespoon white wine vinegar 
• 2 teaspoons caster sugar
• ½ teaspoon freshly ground black pepper
• ½ teaspoon sea salt flakes
• oysters
• rock salt, for serving 
• small jar salmon roe, for serving

1. Combine the lemon juice, water, vinegar, sugar, pepper and salt in a bowl and stir until the sugar has dissolved.
2. Pour into a shallow dish and cover, freeze for 1 hour until slushy. Stir with a fork to break up the ice crystals and then return to the freezer for another hour or until frozen.
3. Scrap the granita again just before serving.
4. Place the oysters on a bed of rock salt and top each oyster with ½ teaspoon of granita and a few pearls of salmon roe.


:::::::::::::::::::::::::::::::::::::::::::::::::::::::::::::::::::::::::::::::::::::::::::::::::::::::::::::::::::::::::::::::::::::::::::::::::::::::::::::::::::::::::::::::::::::::::::::::::::::::::::::::::::::::::::::::::::::::::::::::::::::::::::::::::::::::::::::::::::::::::::::
Green apple and vanilla martini
Makes enough apple and vanilla syrup for 8-10 martinis.

• 1 cup sugar
• 1 cup water
• 3 green apples
• 1 vanilla bean, halved lengthways
• juice of 1 lime
• ¼ cup caster sugar
• vodka, chilled in the freezer

1. Combine the sugar and water in a small saucepan and stir over a medium heat to dissolve the sugar. Remove the peel from 2 apples and add the peel to the sugar syrup with half of the vanilla bean. Place the apples in a bowl of cold water to prevent them from browning and juice later. Simmer the syrup for 5 minutes, remove form the heat and allow to cool. Strain and discard apple peel and vanilla bean. Chill the syrup.
2. Juice the 2 peeled apples and add the lime juice, chill.
3. Scrap the seeds from the remaining half of the vanilla bean and rub the vanilla seeds into the caster sugar, set aside.
4. Chill 2 martini glasses and dip the rim in the vanilla sugar. Pour 1 tablespoon of the apple and vanilla syrup into each glass, add 2 tablespoon of vodka (or more if you like) into each glass and then top with fresh apple and lime juice.
5. Using a mandolin thinly slice the remaining apple; serve a slice in each glass.


A special thanks to www.thesaltbox.com.au for supplying us with Hiwa Kai Black lava salt for this shoot.


CELEBRATE THE YEAR OF THE SNAKE
Chinese New Year is here, so grab some friends and host a Chinese dinner party. This month the food dept debuts on  SBS Food online, so please take a look. There's a fabulous crispy chicken recipe which you can use in the salad recipe below. 
http://www.sbs.com.au/food/article/6114/Blog_App%C3%A9tit:_the_food_dept 


Our Chinese New Year's recipe is traditionally called Yu Sheng. This salad is a symbol of abundance, prosperity and good fortune. The food dept. recipe uses delicious, shredded ‘white cooked chicken but traditionally it is served with raw fish. This salad is made at the table, each ingredient that symbolizes something for the New Year is added to the salad and then everyone around the table uses their chopsticks to toss the salad while saying an auspicious wish. It is thought that the height of the toss symbolizes the level of the fortune.

Each ingredient symbolizes something for the New Year. Here are a few for good luck.
Carrot – good luck is approaching
Pomelo - good luck and good sailing
Peanuts finely chopped – household filled with gold and silver
Sesame seeds  - prosperity for business

:::::::::::::::::::::::::::::::::::::::::::::::::::::::::::::::::::::::::::::::::::::::::::::::::::::::::::::::::::::::::::::::::::::::::::::::::::::::::::::::::::::::::::::::::::::::::::::::::::::::::::::::::::::::::::::::::::::::::::::::::::::::::::::::::::::::::::::::::::::::::::::
Chinese New Year chicken and pomelo salad with a sweet plum dressing 
This dish is usually served at the beginning of a banquet as an appetizer.

The Chicken in this salad is ‘white cooked chicken’ a wonderful recipe to master. As well as this delicious salad it is the perfect base for the food dept’s Crisp skin chicken with five-spice salt and sweet vinegar dressing. But don’t be afraid to duck into your local Chinese bbq kitchen and pick up a chicken to make things even easier.
Serves 4.

• 1 medium pomelo or ruby grapefruit
• ½ ‘white cooked’ chicken, meat removed from the bones and shredded
• 1 medium carrot, peeled and shredded
• 3 shallots, julienned
• 2 cups bean sprouts
• 1 Lebanese cucumber, halved lengthways, seeded and julienned
• ½ cup coriander leaves
• ½ cup salted peanuts, finely chopped
• 1 tablespoon toasted sesame seeds
• 8 wonton wrappers, julienned and deep-fried until crisp or any pre-prepared crispy noodle
• 1 quantity Sweet plum dressing

1. To prepare the pomelo cut off the stem end. Score the skin in segments from the top down to the base and then peel away the skin in these segments. Once all of the skin has been removed place your 2 thumbs into the top of the pomelo and pull it apart as if you are breaking an orange into segments. Pull the segments of pomelo apart and remove any pith and membrane. Break the peeled segments into bite size pieces and put aside for the salad.
2. Arrange the chicken, pomelo and each salad ingredient on a platter in individual piles. Place peanuts, sesame seeds and fried wontons in smaller serving bowls around the platter. Place the dressing in a jug.
3. Give each diner a pair of chopstick and serve the platter at the table. Sprinkle over the peanuts, sesame seeds, fried wontons and drizzle over the Sweet plum dressing. Each person uses his or her chopstick to help toss the salad before serving.

Sweet plum Dressing
Makes ¾ cup.

• ½ cup Chinese plum sauce
• 1 tablespoon Chinese rice vinegar
• 1 tablespoon water
• juice of 1 lime juice
• 1 teaspoon sesame oil
• ¼ teaspoon five spice powder
• ¼ teaspoon ground cinnamon

1. Combine all ingredients in a small bowl and use as required.


Friday, February 8, 2013

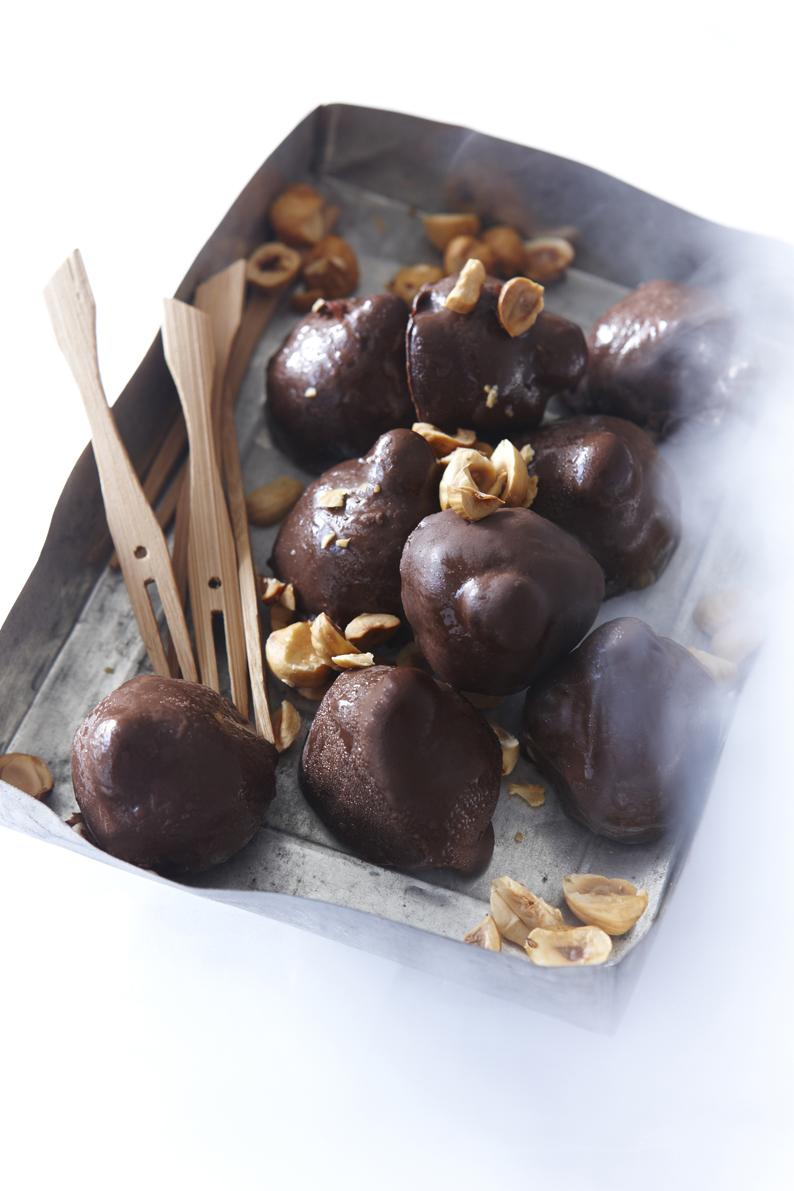
MELT – Get ready for Valentine's day and surprise your other half with these decadent chocolate balls.

:::::::::::::::::::::::::::::::::::::::::::::::::::::::::::::::::::::::::::::::::::::::::::::::::::::::::::::::::::::::::::::::::::::::::::::::::::
Bacci ice cream balls
With one little mouthful you will fall in love with our wonderful bacci ice cream balls. 
Makes 24 balls

• 500g hazelnut gelato
• 24 hazelnuts (approximately 1/3 cup), roasted and skinned 
• 500g dark chocolate, roughly chopped

1. Place a lined baking tray into the freezer to chill. Using a small ice cream scoop or a melon baller, scoop approximately 1 tablespoonful of the hazelnut gelato into a ball. Place onto the lined tray and return to the freezer for 30 minute or until firm.
2. Top each ball with a hazelnut and again return to the freezer.
3. Working with half of the chocolate at a time, place it into a heatproof bowl and place over simmering water. Stir until melted, remove from the heat and allow to cool slightly.
4. Place a hazelnut gelato ball onto a fork and spoon over melted chocolate, shake off excess chocolate and using a palate knife carefully lift onto the freezer tray and return to the freezer to set, repeat with remaining chocolate and gelato balls. Store in an airtight container in the freezer for up to 1 month.


Monday, January 28, 2013

MELT - In a sticky situation?..... lick your way out with our frozen ice-creams and icey pops.


 Prosecco ice pops with raspberry and vanilla
Pandan ice cream with toffee pecans in a waffle cone
 Cherry sorbet on brioche rolls
Coconut and rum granita with fresh pineapple 
 Brownie and honeycomb ice cream cake with chocolate fudge sauce
Yogurt berry icy poles


:::::::::::::::::::::::::::::::::::::::::::::::::::::::::::::::::::::::::::::::::::::::::::::::::::::::::::::::::::::::::::::::::::::::::::::::::::
Prosecco ice pops with raspberry and vanilla
Grab your cossie (or swimsuit for non-aussies) and your swan inflatable and float around the pool with one of these sweet icey pops in your hand. You'll be the talk of the town!
Makes approximately 10 x 125ml ice pops, depending on the size of the moulds.

• 1 bottle of Prosecco
• ½ cup water
• 1 cup sugar
• 1 vanilla pod, halved lengthways
• 125g fresh raspberries, torn

1. Combine the Prosecco, water, sugar and vanilla pod in a saucepan over a medium heat, stir until it comes to the boil and the sugar has dissolved. Remove from the heat and allow to cool to room temperature, remove the vanilla pod.
2. Pour the mixture evenly between icy pole moulds, leaving approximately 1cm at the top of each mould, the liquid will expand on freezing.
3. Place in the freezer for 3 hours or until the liquid becomes slushy. Distribute the torn raspberries between the moulds pushing them down through the Prosecco mixture. Insert ice pop sticks and freeze for 8 hours or until frozen solid.
4. To unmould the pops, run the moulds under hot water for a few seconds, then gently pull the sticks, serve immediately.


:::::::::::::::::::::::::::::::::::::::::::::::::::::::::::::::::::::::::::::::::::::::::::::::::::::::::::::::::::::::::::::::::::::::::::::::::::
Pandan ice cream with toffee pecans in a waffle cone
There's a little bit of Asia in every bite of these pale green ice cream cones.
Makes 1½ litres

• 2 cups milk
• 600ml cream
• 6 pandan leaves, twist the leaves and tie in a knot to release the flavour
• 1½ cups caster sugar
• 8 egg yolks
• natural green food colouring
• 1 quantity Toffee pecan chunks
• waffle cones, for serving


1. Combine the milk, cream, pandan leaves and ½ cup of the sugar in a saucepan, stir over a low heat until the sugar has dissolved and bring to a simmer. Remove from the heat, cover and allow to steep for 1 hour.
2. Combine the remaining 1 cup of sugar and egg yolks in a bowl and whisk until pale and creamy. Gradually whisk in the cream and pandan mixture.
3. Return the mixture to the saucepan and stir over a low heat until slightly thickened and coats the back of a spoon. Do not allow the custard to boil or it will curdle.
4. Remove from the heat and add the colouring one drop at a time until the desired colour green is reached. Strain into a large jug and chill for 2 hours.
5. Once cold churn in an ice-cream churn according to manufacturer’s instructions.  When ice cream is frozen and ready to remove from the churn add 1 cup of the Toffee pecan chunks and mix through.
6. Place into a freezer container and freeze for 4 hours or overnight.
7. Serve scoops of ice cream in a waffle cone topped with extra Toffee pecans.


:::::::::::::::::::::::::::::::::::::::::::::::::::::::::::::::::::::::::::::::::::::::::::::::::::::::::::::::::::::::::::::::::::::::::::::::::::
Toffee pecans
Makes 1½ cups

• 110g pecans, roasted
• 1 cup sugar
• ½ cup water

1.Place the pecans in a single layer on a lined baking tray and set aside.
2. Combine the sugar and water in a saucepan over low heat. Stir to dissolve sugar, do not boil, increase to a medium heat and boil until a deep golden caramel colour.
3. Quickly pour the caramel over the pecan nuts to completely cover. Set aside at room temperature to harden.
4. Roughly chop into approx. 1cm chunks and use as required.
food dept. fact: Store praline in an airtight container to prevent it from becoming sticky in humid conditions.


:::::::::::::::::::::::::::::::::::::::::::::::::::::::::::::::::::::::::::::::::::::::::::::::::::::::::::::::::::::::::::::::::::::::::::::::::::
Cherry sorbet on brioche rolls
Before you become seduced by the decadent magenta velverty masses of cherry sorbet, which you may feel like diving into, rememeber it tastes even better wedged between two sweet little brioche buns. Oh me oh my this is delightfully devilish and totally irresistible.
Makes 1 litre sorbet

• 600g fresh or frozen cherries, pitted
• ¾ cup caster sugar
• 1½ cups water
• juice, 1 lemon
• ¼ cup cherry liqueur
• brioche rolls, to serve

1. Place the cherries, sugar, water and lemon juice into a pan and bring to the boil. Simmer for 1 minute, remove from the heat and leave to cool to room temperature.
2. Place the cherry mixture into a blender with the cherry liqueur and process until smooth. Pass though a sieve and leave in the fridge until chilled. 
3. Pour the mixture into an ice cream maker and churn until frozen. Place into a freezer proof container and freeze until required.
4. Halve and toast the brioche buns and sandwich back together with the cherry sorbet, serve imeadiately.

food dept. fact: If you don’t have an ice cream maker then place the sorbet mixture into a bowl in the freezer and every 2 hours remove from the freezer and beat until smooth. Repeat this about 3 times until frozen.


:::::::::::::::::::::::::::::::::::::::::::::::::::::::::::::::::::::::::::::::::::::::::::::::::::::::::::::::::::::::::::::::::::::::::::::::::::
Coconut and rum granita with fresh pineapple 
This dessert is so easy and flavoursome. You will get lots of oooohhhhh's and ahhhh's from those who try this refreshing ice. It's a wonderful palate cleanser after dinner and before dessert. Make ahead and keep in your freezer, then serve in gelato bowls, your guests won't be able to stop at one scoop, trust us... we know!
Makes approx 1 litre

• 1 cup sugar
• 3 cups water
• 1 cup coconut milk
• ¼ cup coconut rum 
• 1 pineapple, peeled, cut in halve lengthways, cored and sliced into thin ribbons

1. Combine the sugar and water in a saucepan over a medium heat and stir until the sugar has dissolved. Bring to the boil and simmer for 5 minutes. Remove from the heat and allow to cool to room temperature.
2. Mix the coconut milk and coconut rum into the sugar syrup and pour into a shallow freezer container and cover.  
3. Freeze for 4 hours, remove from the freezer and break up the ice crystals by scraping with a fork, mix well and return to the freezer for another 4 hours or overnight.
4. Scrap again with a fork and serve with pineapple ribbons. Store the granita in the freezer for up to 1 month.


:::::::::::::::::::::::::::::::::::::::::::::::::::::::::::::::::::::::::::::::::::::::::::::::::::::::::::::::::::::::::::::::::::::::::::::::::::
Chocolate brownie and honeycomb ice cream cake with chocolate fudge sauce
Makes 1 x 20cm cake, serves 8

• 200g butter, roughly diced
• 150g dark chocolate – 70% cocoa, roughly chopped
• 3 eggs, lightly beaten
• 1½ cups brown sugar
• 1 teaspoon pure vanilla essence
• 1 cup plain flour
• 2 x 1 litre tubs good quality vanilla ice cream
• 2 x 130g bags honey comb, (1 pkt cut into 1cm pieces and the other bag for serving)

1. Preheat oven to 180ºC (360ºF). Grease and line a 20 x 30cm slice pan.
2. Combine the butter and chocolate in a small saucepan over a low heat and stir until butter and chocolate have melted. Set aside and allow to cool.
3. Combine eggs, sugar and vanilla essence in a bowl and add the cooled chocolate mixture.  Place the flour into a mixing bowl. Pour in the chocolate mixture and stir until just combined.
4. Pour into the prepared slice pan and bake for 20-25 minutes or until cooked when tested. Allow to cool completely in the pan.
5. Remove from the pan and cut a circle using a 20cm spring form pan as a guide. Grease and line the spring form pan, ensuring the lining extends at least 5cm above the rim of the pan. Place the circle of brownie in the base, set aside.
6. Soften the ice cream and tip into a large mixing bowl.  Cut up the remaining fudge brownie into 1cm pieces and mix that with the chopped honeycomb through the softened ice cream.
7. Pour over the fudge brownie base in the spring form pan and place in the freezer for 6 hours or overnight.
8. Unmold and serve with Chocolate fudge sauce and extra honeycomb.


:::::::::::::::::::::::::::::::::::::::::::::::::::::::::::::::::::::::::::::::::::::::::::::::::::::::::::::::::::::::::::::::::::::::::::::::::::
Chocolate fudge sauce
Makes 1½ cups

• 200g dark chocolate, roughly chopped
• 100ml cream
• 2 tablespoons agave syrup or light corn syrup

1. Combine the chocolate, cream and agave syrup in a heatproof bowl and place over a saucepan of simmering water.
2. Stir gently until chocolate has melted and all of the ingredients are combined.
3. Remove from the heat and allow to cool slightly, serve warm over the ice cream cake.


:::::::::::::::::::::::::::::::::::::::::::::::::::::::::::::::::::::::::::::::::::::::::::::::::::::::::::::::::::::::::::::::::::::::::::::::::::
Yogurt berry icy poles
If you want to go "slightly" healthy then this is the recipe for you. 
Makes approx. 10 x 125ml icy poles, depending on the size of the moulds.

• 1 cup caster sugar
• 1 cup water
• zest 1 lemon, peeled with a vegetable peeler 
• 500ml Greek style yogurt
• 250g frozen mixed berries


1. Combine the sugar, water and lemon zest in a saucepan over a medium heat and stir until the sugar has dissolved, bring to the boil and allow to simmer for 2 minutes. Remove from the heat and allow to cool to room temperature.
2. Remove the lemon zest from the syrup and stir the syrup into the yogurt.
3. Roughly chop the frozen berries and gently fold into the yogurt mixture and working quickly fill your moulds with the mix and place into the freezer for about 1 hour. Insert icy pole sticks into the center of each mould and freeze until solid for 4 hours or overnight.

food dept. fact: We used old tins to createinteresting shapes for our Yogurt berry icy poles but you can also use small glasses or even icy pole moulds for this recipe.